Monday, February 20, 2017

February 20th ..... Working in the yard!

Another gorgeous day at Taddiken Farm.  February 20th.   Sunshine, 68 degrees and no wind!  Bonus!  I have been home and able to take full advantage of the day.  I took out a massive planting of Sage.  Cleaned off two raised vegetable beds and added a top layer of rotted silage.  

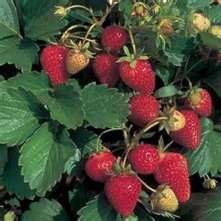
I spaded out a bed of strawberry plants.  (That was the big job.). They were June bearing Jewell strawberry plants and had been a disappointment since I planted them years ago.  Never being very big, they reverted back to small tasteless fruit.  I have an order coming of ever bearing Ozark Beauty and Allstar June bearing berries to replace them.  I know that the ever bearing won't produce as well as June bearing but think it will be nice to have a few throughout the summer.  We'll see.  

Let's hope this nice weather lasts a few more days.  In years past, I have taken these nice winter days for granted and gotten nothing done outside.  March hits with it's bitter cold winds and again, I get nothing accomplished outside.  By April, I am overwhelmed and frustrated!  Maybe, it will be different this year?  (Heard that before!)

I know that there will be winter left to come.  This is after all, Kansas.  It's sure nice to have a break from cold weather and dig in the dirt a bit!  

Monday, September 12, 2016

The War on Squash Bugs

Squash bugs are a member of the Coreidae family which also includes bedbugs! They
have been a gardener's #1 enemy this summer!  I have always had some, but never like this year!  Everyone I know has had them.  I always battle them awhile before they finally take down my zucchini squash.  This year they destroyed my four plants before they produced even one squash!  That was not insult enough.  They started in on my sweet success cucumbers!  Little by little my beautiful vines were reduced to a pile of brown leaves.  
Hatching eggs on the underneath leaf side

Immature squash bugs

Most of us know that Seven insecticide does not phase an adult squash bug.  That heavy shell on their back protects them.  It will slow down baby squash bugs.  I was diligent in picking the adults off and destroying them.  I removed  any leaves that had eggs layed on the underneath side.  I dusted Seven to get those young ones.  I should have saved my time and energy for another chore.  The squash bugs quickly won.

A fellow Master Gardener told me about a product called Food Grade Diatomaceous Earth.  It is basically ground sedimentary rock particles.  The squash bugs eat it and ..... they croak!  They don't even live long enough to lay those hundreds of eggs!  If applied early it will not come into contact with your vegetables but if it should, the dust can simply be washed off without harm. If you google the product you will see that it is safe for humans to actually eat.  The harm is in breathing it.   I was very careful not to breath the dust as I applied it.  Common sense says not to inhale rock particles.  

I bought a bag of it from Amazon.  I also bought an inexpensive "duster" to apply it.  Next, I replanted my cucumbers and zucchini.  I also replanted in different locations.  Once the plants were up and going, I dusted the leaves and the dirt around them.
I am harvesting zucchini and the cucumbers are blooming without a squash bug in sight!
 Victory!


Saturday, May 2, 2015

Plants in a Jug ..... Worked!

Earlier this Spring, I posted a blog about starting seeds in milk jugs.  I had seen this done on another blog, A Garden for the House.
                           .

I started out on the right track.  Planted four jugs and put them outside to sprout.  First the wind took them for a patio spin.  I replanted.  Next Liberty dog used them for areal toys.  I totally lost all of the lavender seeds on that deal.  I replanted. 

Now down to three jugs, I put them in a clear plastic tote on top of my patio table.  They have been there for about four weeks now.  The only attention I gave them was to bring them in twice before frosts.  You can see that they have done a great job of sprouting and growing into little plants.  The end result is that the plants are not spindly like some of the ones grown inside.  

The tall lacy plants are German Chamomile.  The plants next to them are Holyhocks.  The plants in the back are Zinnias.  The Zinnias are small yet so the lid is going back on that jug for a couple more weeks.  I am going to leave the other two jugs open and in the tote to "harden" for another week before I transplant them in the garden.  

I have learned several things.  This is a really easy and successful way to start seedlings.  Next year I won't mess around with allowing the dog access and replanting!  Also, next year I will plant a lot more jugs! 

Monday, March 30, 2015

Plants in a jug.

One of the food and gardening blogs I follow is "A garden for the house" written by Kevin Lee Jacobs.  This winter (Feb), he blogged about starting seeds in milk jugs.  He has apparently been starting seeds in this manner for several years.  


I was interested.  Especially interested since I am a total failure at starting seeds indoors
The obvious savings when starting our own seeds is enough to keep me optimistic that I may one day accomplish that crop of hardy baby plants to set out in our garden.  


Kevin starts hardy early spring plants in January and February.  More tender perennials are started now and brought inside if there is a threat of frost.  I hope you will go to his blog and see the planting schedule etc...
I am trying to start Holly Hocks, Lavender, German Chamomile, and Zinnias.


This is what I am doing.....  
I started with four clean milk jugs.  You won't need the lids so throw them away.  Be sure to label each jug with a permanent marker.  Next I cut the tops nearly off.  I left the piece under the handle intact to make a 'hinge".  I used an ice pick to punch drainage holes in the bottom and lower sides of the jugs.  


I bought a $6 bag of seed planting soil at the nursery.  This soil is lighter and is a better bed for small seeds.


I filled my milk jugs about 1/3 full of soil and sprinkled in a generous amount of seeds and stirred the soil a bit.  Next, I sprinkled in water until the soil was good and moist.  I pulled the tops down and secured them with duct tape.  I first put them all in a protected area of the patio.  The next morning, Mark brought on of the jugs in.  It had blown to the north end of the yard.  The other three had scattered around the patio.  Plan B was to put them back out on the patio only this time, I put them tightly in this clear tote.  I caught a glimpse of Liberty running around the yard tossing a milk jug!  Plan C is working ..... I put the tote on a table.  I am down to three jugs.


Now I wait.  You will be getting the update in a few weeks.  Let"s hope for the best!


Monday, February 23, 2015

To prune ..... or not to prune?

A little pruning can create a beautifully shaped tree.
If you have the itch to get outside and work in the yard a bit ..... This blog is for you!  Admittedly, there is not much going on out there, in fact, we have had snow on the ground a big share of February?  

February's gardening activity is Pruning.  Pick a nice mild day.  Grab your loppers and pruning shears and get busy.  Deciduous trees can be pruned about any time of year but the time they are dormant works best.  There is less stress involved when pruning is done while they are "resting".  Also, their structures can be seen better without leaves.  

I try to keep our young trees shaped up ..... cross over limbs pruned off and main leader limbs left strong.   I keep our full grown trees trimmed up high enough that I can zip around under them on my mower.  When it comes to reshaping these large trees, I call a professional :-)

Spring flowering trees bloom on old wood so should be pruned AFTER they bloom.  Summer flowering trees bloom on new wood so can be trimmed during the winter dormant period.


While you are out there pruning away ..... This is also a great time to prune those shrubs. Some of our's have grown bigger than the space they are in so they will get a hard prune before they "wake-up"!   Our dwarf burning bush has grown to over six foot tall and six feet wide.  This project may involve a chainsaw! 


This is also the time of year that I prune our grapevines.  Those long, chopped off vines make some awesome wreaths.

Tuesday, January 20, 2015

January Gardening

As gardening months go, gardening in January is one of the easiest.  The ground is frozen.  It's too cold to venture out.  All that is left is a mug of tea, an easy chair and that stack of seed catalogs!

A productive garden is a well planned garden and oh what fun that planning is!  New seed catalogs began arriving last November.  As I start looking through them I have to remind myself NOT to get carried away with ordering!  

Throughout the past growing season, I keep notes about new flower and vegetable varieties that I want to try.  I add that list to this year's seed catalog "wants" and I am pretty well set.

My current garden is a typical Kitchen Garden.  With the exception of the sweet corn, which we grow bushels and bushels of for the freezer, the produce I grow is consumed fresh.  The days of canning and freezing massive amounts of vegetables are long past here at Taddiken Farm.  


That said, the Master Gardener in me wants to experiment with different varieties of vegetables.  Each year I try a few new ones.  Sensibility and experience tells me that the tomato I need to be growing out here is Celebrity.  I grow them every year and add another something new.  This year I am trying a couple of Rutgers tomato plants.  My nephew Joe is a Master Gardener in Oregon and has convinced me to give them a try.  
Also new this year will be Socrates cucumbers.  I have been reading about their ability to produce masses of dark green sweet cucumbers.  We'll see.  On the flower side, I want to plant more fall flowering periennels along our fence.   Asters, garden mums etc...


The biggest change I am making this season?  I am ordering all of my seeds from ONE catalog.  One order to keep track of.  This will be a first.  Happy planning to you!


Friday, July 25, 2014

Refrigerator Pickles 101

In the world of growing cucumbers, one of two things happens.  The vines either shrivel and die early or they flourish and produce more cucumbers than you want or need.  As a gardener, I would surely take the latter situation.

There was a time when I had big stone crocks full of pickles curing on our kitchen counter.  Dark green lime pickles. Bright red cinnamon pickles.  Dill pickles.  Anymore, Mark and I eat a ton of refrigerator pickles during the summer.  Leftover pickles can last in the freezer all winter. 

This summer, I discovered a great hint for making pickles crisp.  An old time cookbook suggested packing a few grape leaves in the jar along with the pickles.  Grape leaves contain "Tannin" which is a natural "crisper".  It works!  In a couple of days, the homemade pickles are crispy as can be!  Forget using those store bought pre mixed pickle spice mixes.  (Which do not make for such a a crispy pickle).  A couple more hints ..... keep an eye on your growing cucumbers and pick them before they are big and bitter.  Baby is better.  As you are washing them, cut off the blossom end and rinse again.  This will help keep your pickles from getting smushy too.

The following recipe is one that I have made and shared for years.  Foolproof and Fabulous!
   
         Martha Stewart's Refrigerator Pickles

Place in a 1/2 gallon jar with lid:
7 cups sliced cucumbers
1 cup sliced onion
1 cup sliced green peppers


Combine and pour over:
1 cup cider vinegar
2 cups sugar
1/2 tsp celery seed
2 tsp salt

Cover and refrigerate 3 days.  Stir every day.  
After 3 days, the pickles may be packaged and frozen.
I have kept these in the refrigerator for several weeks
although they usually never last that long!


Sunday, October 14, 2012

And ..... It's a wrap!

October brings mixed emotions to gardeners.  We've had a couple of frosts. It's time to wrap it up.  

1.  Pots need to be brought in to Warner's temps or dumped and put away. 


2.  Cuttings from plants you want for next spring can be started inside. 


2. One last mowing and an application of dry nitrogen should put our lawns to bed for the winter.  While you're at it, throw some nitrogen on the shrubs and perennial beds.


3.  It's time to clean up the vegetable garden. Haul off the dead plants. Sprinkle some of that dry nitrogen on this garden spot too.  


4.  Same routine for flower gardens.  Pull those weeds that linger.  Re-mulch the beds that need it. 

4.  If you need to patch in new grass, you are running short on time.  Get it in ASAP and keep it damp.

 4.  Bulbs and or tubers to be saved for next spring, need to go to the cool end of the basement.

 5. We give our compost pile one last stir and tarp it for the winter. 


5.   Get out your list of indoor projects and get busy!

Friday, May 4, 2012

A tisket a tasket ..... an iris in my basket.

Iris blooming at Taddiken Farm
If you are reading this gardening blog, then I presume you are a gardener or at least interested in gardening.  Right?  So what is your favorite spring flower?  Mine is easy ....... it's the iris.  So many great atributes.  They are fairly carefree.  They sport big showy blooms of an infinity of colors.  The plants are nearly indestructable. They thrive in any spot in our yards. They multiply over time so can be divided and shared.  They have a nice smell but not a strong smell so I can bring them into the house if I want.  They take up a decent amount of space in the garden.  The big drawback to growing iris in my opinion, is that grass loves to take up residency in their beds.  You cannot get up next to the iris plants with a hoe.  Ever try pulling grass out from around those tubers.  Doesn't work well either. 

I just opened my May newletter from the Extention Service.  It has an article about a couple of chemicals that we can use for those pesky grassy iris beds.  They can also be used in broadleaf perennial beds.

According to Extention Horticulture Agent David Coletrain, there are two major weed killer types that are used to kill grassy weeds in broadleaf plants.  The herbicides "Poast" and Fusilade II" can help gardeners who don't have the time or inclination for hand weeding.  These products are specific for controlling grasses.  All broadleaves are not affected.  This means that the applicator can spray the top of perennial beds and control grass problems. 

Fusilade is often sold under the names of "Grass-B-Gon," and  "Grass-No-More-Over the Top Spray" and "Over the Top Grass Killer".  Poast is commonly sold as "Hi-Yield Gras Killer" and Monterey Grass Getter". 

The above info is from a newsletter called River Valley Green Thumb Guidelines.  It may be found at http://www.rivervalley.ksu.edu/


Thursday, April 19, 2012

Pots with Personality.......


Red Dragon Wing Begonias
Our mild Winter glided right into this beautiful Spring and I have hardly blogged about gardening!  In my defense, it is partly because I have been outside working - a lot.  Still so much to do out there but as always, it will all get finished up..... eventually. 

I want to visit about container gardening.  We used to think that meant putting a tall lanky tomato plant in an ugly clay pot.  Today, the possibilities are endless!   Containers run the gamut from Shabby Sheik to upscale modern pottery.  Pots are everywhere.  Hardware stores.  Big box stores. Garden centers. Mail order catalogs. If you are fascinated by the old tin and distressed look, you can entertain yourself with trips to the second hand stores, auctions, flea market etc...  If it holds dirt, it can be your next container garden.  


Iron chair with a seat full of assorted succulents.

Who ever thought that cement blocks could make this statement?
Old chicken feeder on a sawhorse.

Something new has caught my eye this season.  Fairy Gardens. Have you seen them? On a recent trip to Arnold's Greenhouse in Leroy, I looked at their huge fairy garden display.  It was approx 6ft X 4ft and looked like the "land of enchantment".  There were miniature "living" trees, tiny flowers and plants, little cottages and barns and Fairies. Of course, the tiny miniture plants were offered for sale there.  IF I talk myself into doing this it will be on a much smaller scale and it will be when my grand daughter is old enough to appreciate it with me.  

Good use of a cracked pot and a "doable" Fairy Garden.

Larger scale Fairy Garden beneath a shade tree.  Wouldn't our Kansas wind just wreck this?!
 I have been experimenting with some pot plantings at our house.  I have started some good looking succulents in my patio pot.  They are an agave plant, a varigated paddle pland and a rose succulent.  Reportedly, they will grow to be very large so I am looking forward to seeing how this looks later in the season.   I also filled a strawberry pot with succulents. 

Recently planted succulents.  Hopefully, with a little TLC they will grow into something with a Wow factor!

 A couple of years ago, my son-in-law Justin hollowed out a maple stump for me.  It's on the east so I had been putting shade loving plants in it and it hasn't done much.  This year I am going to put Margarita sweet potato plants and a bubble gun putunia in that stump. 

This isn't my stump.  Ours is about the same size.  At present, it is empty.  Stay tuned for my end result.

I have a huge red pottery pot in my north bed.  Last year I planted it totally to purilla.  It likes sun or shade.  It was georgous all summer!  I am planting it to purilla again this year. 

Purilla

This wash tub has one bubble gum petunia growing in it.  It doesn't always take a ton of plants to make a big statement. 

One Bubble Gum Petunia

The great thing about container gardening is that anyone, anywhere can have some fun with it.  Whether you have pots sprinkled around your yard or have one container at your front door, have fun with it.  Give those pots a little personality! 

Draws your eye right to this opening in the wall doesn't it?
This was picture was taken along the River Walk, San Antonio

Ornamental cabbage in a shade garden at Nell Hills, Atchinson

Friday, March 9, 2012

Spring is in the air .....still

On a normal year, a warm spell in March triggers a burst of excitement in my gardening buddies and me. Those of you who live in my geographic area know that we've been experiencing the excitement of spring since about last October!  We do not remember ever having been exposed to a winter as mild as this one just past. We have recently endured several days of extremely windy, 60 degree weather followed by a night of thunder, lightening and a ground cover of small hail.  This said, I am totally clueless  as to what Mother Nature might bring to us over the next several months.  We'll just forge on as usual.

If you haven't gotten your tree pruning finished up, it's time ........ nearly past time.  Also, you should be laying down bulb fertilizer ASAP.  Probably goes without saying that we want to take advantage of this warm weather to finish cleaning off those beds and garden spots that were skipped last fall.  I am putting in an asparagus bed and some new rhubarb plants.  It's time to get that area spaded up and trenches made.  I am only putting two more rhubarb plants in so they will reside at the end of the asparagus bed.  I have a raised bed of tired strawberry plants that I plan to plant another two dozen plants into. 

I have been doing some research into these three plantings so will pass my findings on to you.  Maybe some of you are planning to plant one or more of these this spring?

Strawberries fit into one of three varieties:

Everbearing.  Produce smaller berries and lesser harvests 2 or sometimes 3 times throughout the growing season. They shoot fewer runners than June bearing.
Day Neutral strawberries produce throughout the growing season when the temperature is between 35 and 85 degrees.  They shoot few or no runners so would be ideal from container plantings.

 
June bearing.  Large abundant fruit with good runner character.  They shoot healthy runners that encourage new plant growth. 
I have ordered 25 Allstar plants. Harvest lasts two to three weeks, generally during the month of June. They are on the recommended K-State Research list.  It's always a good idea to check these Research and Extension lists for your state. 


My asparagus plants will be from the Jersey series.  They will be all male plants.  My research tells me that 10 plants are sufficient for one person who only wants fresh asparagus.  I am planting 20 plants. They will need to be planted in a long trench.  Stark Brothers Nursery site has a great planting guide if you need one.  Be sure to plant in full sun and remember that after their harvest season, they shoot up beautiful fern fronds.  These can create shade in an area that you might not want shaded.   Once the plants come up later this spring ....... Leave them alone!  Resist harvesting it until the 3rd year and you are good to go for the next 25-30 years!

Trench with asparagus roots ready to plant.


This asparagus after growth can be used in cut flower arrangements!

Rhubarb varieties are a little more tricky.  I have a plant of my mom's that is absolutely ideal.  The flesh is dark red and fairly sweet.  Most importantly, it does not go to seed.  I have no idea what variety it is.  My two new plants are advertised as a close match.  They are Red Scarlet.  We'll see how they work out???